
Installation Instructions
Page Contents
Installation Instructions
The following are instructions for installing Bodhi Linux on to your computer from a working Linux/Windows system via a USB drive (eg: thumb-drive). This is the recommended method. Installation using CD/DVD is also possible.
Bodhi Linux utilizes a Live Environment which lets you “try before you buy” – that is, you can use Bodhi Linux without actually installing it. Note that any changes made in the Live Environment will not be saved across a reboot**. Following instructions through Sections I, II, and III will allow you to enter the Live Environment.
Note: Starting with Bodhi Linux 7.0, the GRUB bootloader (GRUB 2.06) from our Ubuntu 22.04 base will not detect other Operating Systems already installed on your system. Please see Why won’t GRUB detect my other OSes for more information including a work around.
** to create a bootable Bodhi Linux live USB drive with persistence, please see our Ventoy tutorial.
I: Preparation
A: Materials Needed
Before beginning, you will need the following things:
-
– A computer (x86 or x64) with an empty/blank hard drive/partition to use.
- If you want to dual boot (from another Linux distribution or Windows) and all your hard drive storage is fully allocated then it’s recommended that you shrink these partitions until you have sufficient free space to create a new Bodhi Linux installation partition.
- If you are willing to overwrite any/all current data, including your current OS: select the Erase disk and install Bodhi – see section IV.
- NOTE: ALL DATA WILL BE ERASED DURING THIS PROCESS!
- – A USB drive that contains no important data
- NOTE: ALL DATA WILL BE ERASED DURING THIS PROCESS!
Bodhi Linux 7.0.0, System Requirements:
Minimum:
- 32bit, 500MHz Processor (including Non-PAE)
- 512MB** of RAM
- 5GB of drive space
- 64bit, 1.0GHz processor
- 768MB of RAM
- 10GB of drive space
** NOTE: The Bodhi installer runs best with more than 512MB of RAM (ideally 1GB or more). With 512MB RAM, the Bodhi Linux installer will work, but it will work slowly. After installation, you will find Bodhi runs reasonably well with 512MB RAM.
Does your system meet these requirements? Check out which ISO image will best suit you/your hardware!NOTE: Is your PC only just meting the Minimal Hardware Specification? Take a look at the Minimal Spec FAQ, you will find answers to questions, comments on software alternatives (when system memory is limited) and successful installs against minimal hardware specs.
B: Download Bodhi Linux
NOTE: See Selecting the Correct ISO wiki page for more information on which version of Bodhi best suits your hardware
Examples below are based on bodhi-7.0.0-64.iso).
-
1) Visit the Download page
-
2) Click the Download link. (If you are familiar with using Torrents, you may select the Torrent Download link for a faster download and less stress on the Bodhi servers)
-
3) Save the file to a location you will remember.
C: Verify File Integrity (highly recommended)
-
1) Using the same Download link as above click the md5 link.
-
2) Save the file to the same location that you saved the Bodhi Linux .iso file.
-
3) Open a terminal emulator (Terminology for example)
-
4) Switch to the directory where you downloaded the files (
/home/user/Downloadsin this example – adjust the location to where you downloaded to):
cd /home/user/Downloads
-
5) View the md5 sum to verify against:
cat bodhi-7.0.0-64.iso.md5
-
6) Generate the md5sum for the downloaded .iso file:
md5sum bodhi-7.0.0-64.iso
-
7) The generated number from step 6 must exactly match the number to verify against from step 5. If the numbers do not match exactly the .iso file is corrupted or was so in the download process and you will have to download again. Likely they do match – then please continue …
-
*7.5) An alternate method of verifying integrity is: after step 4, write:
md5sum -c bodhi-7.0.0-64.iso.md5
-
If the .iso file is OK you will get a reply like:
bodhi-7.0.0-64.iso: ok
-
Within Windows, you can run the following command to check the .iso (hit Windows R):
certutil -hashfile [filename] MD5
- or, within PowerShell:
Get-FileHash [filename].ext -Algorithm SHA512 | Format-List
II: Create a Bootable USB
The following sub-sections are OS-specific, use the quick links below to jump to your preferred method:
- Linux Only
- Windows Only
- OS agnostic
A: Unetbootin Method (Linux Only):
NOTE – 1: may not work with UEFI motherboards
NOTE – 2: There are known issues using Unetbootin when using Windows. See the dedicated section titled “Rufus (Windows 7/8/10 only)” (below) for the recommended approach for creating Live USB from within Windows.
-
a) Install Unetbootin
- b) Insert your USB drive.
-
c) Open Unetbootin – method will vary depending on distribution, or open a terminal and type
unetbootin
-
d) Type your password when prompted, then click OK
-
e) Click the bottom radio button next to Diskimage
-
f) ISO should already the default selection in the adjacent drop-down menu. If not, select ISO from the list.
-
g) Click the button marked with ellipses (…)
-
h) Navigate to the location where you download the Bodhi Linux .iso
-
i) Select
bodhi-7.0.0-64.isoand click OK -
j) The Type: selection drop-down menu should default to USB Drive. If not, select USB Drive from the list.
-
k) Select the drive location of your USB drive in the Drive: drop-down menu. The location will vary among systems.
-
l) Click OK. After a few minutes, your bootable USB drive will be created.
More information about unetbootin is available on their site at https://sourceforge.net/projects/unetbootin/
B: Command-Line ‘dd’ Method (Linux Only)
If the unetbootin method does not work for you, use this ‘dd’ method from the command line:
- a) Open a terminal.
- b) Navigate to the location where you downloaded the Bodhi Linux .iso
ex.: cd /home/(username)/downloads/bodhi-7.0.0-64.iso
- c) To inspect your drives; insert your USB drive and in the terminal type:
sudo parted -l
**Tip – run the above command before and then after inserting your USB Drive – the drive that shows up will be your USB Drive (this can be helpful for new users to interpret the output from the ‘sudo parted -l’ command).
You will see output representative of all of your HHDs/SSDs/USB drives (types, partitions, etc) similar to the following:
Model: ATA Samsung SSD 850 (scsi)
Disk /dev/sda: 1000GB
Sector size (logical/physical): 512B/512B
Partition Table: gpt
Disk Flags:

Number Start End Size File system Name Flags
1 1049kB 106MB 105MB fat32 EFI system partition boot, esp
2 106MB 1050MB 944MB ntfs Basic data partition hidden, diag
3 1050MB 1184MB 134MB Microsoft reserved partition msftres
4 1184MB 109GB 108GB ntfs Basic data partition msftdata
5 109GB 220GB 111GB ext4 bodhi_4
6 424GB 441GB 17.3GB linux-swap(v1)
7 441GB 871GB 430GB ntfs msftdata
8 978GB 979GB 524MB xfs msftdata
9 979GB 1000GB 21.5GB ntfs Basic data partition hidden, diag

Model: TOSHIBA TransMemory (scsi)
Disk /dev/sdb: 2063MB
Sector size (logical/physical): 512B/512B
Partition Table: msdos
Disk Flags:

Number Start End Size Type File system Flags
1 1049kB 2063MB 2062MB primary fat32 boot
This output is telling you that a 2 GB Toshiba USB drive plugged in has been allocated as /dev/sdb. From this information, you will now be able to use ‘dd’ to create a live, bootable Bodhi USB drive.
*** Do NOT overwrite your PC’s hard drive during this next step or you will very likely lose all data on your hard drive. Be VERY SURE that the device you type is NOT your PC’s hard drive. ***
The previous step determined that /dev/sda is our 1000 GB hard drive, we do NOT want to enter that into the next step, or it will be over-written. If you have more than one physical hard drive in your PC, be sure you don’t overwrite that (or those) either. OK?…
- d) From the data collected during the previous step, you can now execute the ‘dd’ command in the terminal:
sudo dd if=/home/(username)/Downloads/bodhi-7.0.0-64.iso of=/dev/sdb
It will take a while to complete this command [without progress output (until it is finished)], so it may just be best to walk away and get a snack or some exercise while this step completes. Trust thy PC!
C: Rufus (Windows 7/8/10 only)
NOTE: With Rufus, the “DD method” must be used when creating the Live USB, otherwise the live USB may fail/error during the USB boot process.
Pay special attention to this in step (f) below. 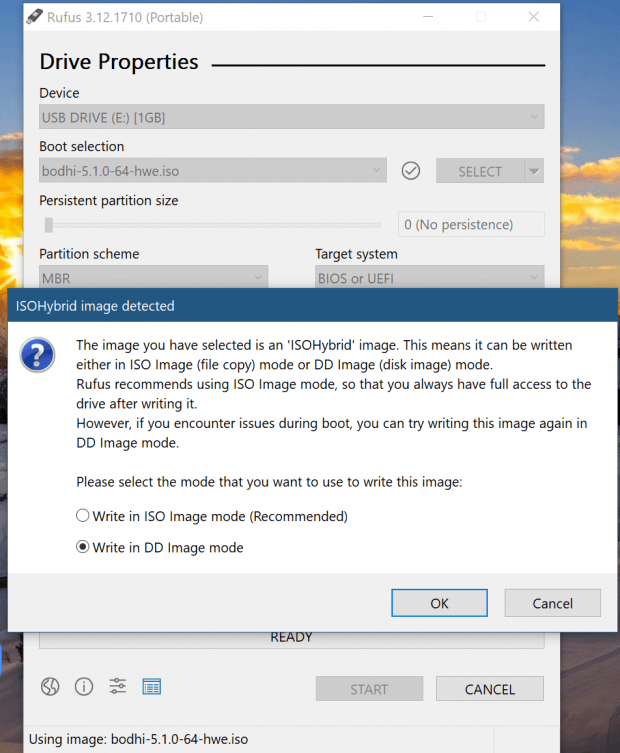
-
a) Download Rufus from the official website. No installation is necessary.
-
b) Insert your USB drive into your PC/Laptop
-
c) Open the Rufus application downloaded in step (a). The file will be named similar to:
rufus-3.12.exe -
d) With the Rufus application open, set the following options
-
Device: set to your the USB Drive added in step (b)
- Boot selection: set to:
Disk or ISO image (please select) - Click the button to the right of Boot Selection labelled
SELECT, a file navigation window will open.
Navigate/select the Bodhi ISO image downloaded earlier (ie:bodhi-7.0.0-64-hwe.iso) - Partition scheme: set to
MBR - Target system: set to
BIOS or UEFI - All other options can be left at their defaults
-
-
e) Click
STARTbutton (bottom right of the window). - f) A pop-up window labelled: ISO Hybrid image detected will now open. You will be presented with two options relating to how the ISO image is written to the USB drive. Select the second option labelled:
Write in DD Image mode. Then clickOK. - g) A final pop-up window will opening warning you that ALL Data on USB will be Destroyed. If you are happy to proceed click
OK. - h). The ISO image will now be written to the USB Drive. Depending on the speed of your USB Drive and your PC/Laptop this can take a number of minutes.
- i) If the write to USB drive completed without error click
CLOSEto terminate the Rufus application.
D: Alternative Optical Media Method
If you want to burn a CD/DVD that will be bootable under both Legacy & UEFI, try this command (it is basically the equivalent of ‘dd‘ for a CD/DVD):
xorrecord dev=/dev/sr0 speed=12 fs=8m blank=as_needed -eject padsize=300k /home/(username)/downloads/bodhi-7.0.0-64.iso
--or--
you may need to replace 'sr0' above with one of --> cdrom, cdrw, dvd, dvdrw (or possibly others - depends on your system)
III: Boot into the Live Environment
A: Prepare Your Computer
Most systems are not set up to boot from a USB stick automatically. Since the method for doing so varies from machine to machine, you may have to experiment and/or consult the documentation for your system’s BIOS. Here are some pointers:
-
Many systems will allow you to enter a “one-time boot menu” by pressing F2 or F12 during the initial system start-up. This will give you several options (CD/DVD, USB, Network, Hard Drive, etc) from which to boot.
-
Look for a message during the initial system start-up that tells you which button to press to enter the BIOS. Often this is the Delete key. From within the BIOS, you are able to alter the Boot Sequence and choose USB as the first device.
- In some cases, the BIOS requires that the USB stick is inserted into a USB port before it will recognize it in the boot order.
A lot of newer systems are no longer coming with a BIOS. Intel’s UEFI standard changed a lot of mechanics in a computer boot sequence. Unfortunately, the details of the changes and exactly how to configure it is beyond the scope of this guide. Please feel free to stop by the forums or join our live chat (discord) for help configuring your UEFI machine.
B: Reboot to USB
-
Insert the bootable USB stick.
-
Reboot to USB using the method determined above.
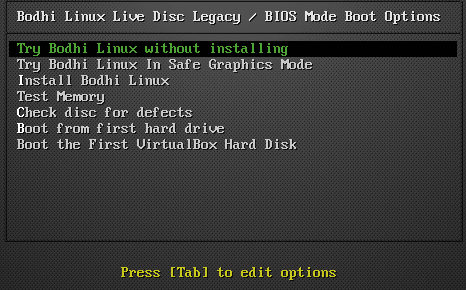
C: Live USB Boot Options
When the Live USB boots you will be presented with a number of options. If you are uncertain which option to select, In most scenarios option (1) is recommended. For older / minimum spec hardware use option (2) or option (3).
NOTE depending on your system’s specs, your selected Boot Option this step may take a while to load – be patient!
- Try Bodhi Linux without Installing
….will boot to the Bodhi’s (Moksha) Desktop. From there you may use the system, install applications and drivers, connect to the Internet and use many of Bodhi’s features. An “Install” icon is available from the Main Menu should you wish to begin the standard installation without rebooting. At the end of a Live USB session, unless an installation is completed, none of the changes you have made will be retained (on the USB Drive).
- Try Bodhi Linux In Safe Graphics Mode
….as in option (1), but it instructs Bodhi to not load graphics drivers (nomodset). Use this option if you have issues using option (1) …such as hanging on startup / desktop display issue. - Install Bodhi Linux
Boots straight into the standard installer. This option is also very useful for PCs/Laptops with Minimum Spec hardware, that have experienced installation issues in options (1) or (2) due to memory constraints / unexpected installer crashes. - Test Memory
- Check disk for defects
This option can help detect defects on your storage device prior to installation (or use if installation issues arise relating to storage device defects) - Boot from first hard drive
IV: Installation to Hard Drive
A: Installation Steps
With the exception of step #1, the following steps outline the installer screen you will be presented with during installation.
-
1. Initialize Installer: Only applies to Try Bodhi Desktop (ie Option 1 or 2 from the earlier Boot Options selection).
From the Bodhi Live Environment, locate and click the Install Bodhi Linux from the Main Menu. The main menu is accessed from the very bottom left of the navigation bar (called a shelf). From the Main Menu navigate to: Applications > Preferences > Install Bodhi Linux 7.0.0. - 2. Welcome:
Select your preferred language and click Continue - 3. Keyboard Layout:
Select your general keyboard style from the list on the left, then select the specific layout from the list on the right. There is also a text entry field where you can test your selections. When satisfied, click Continue. - 4. Updates and Other Software
Allows you to set the following options. When satisfied, click Continue.- Download updates while installing Bodhi (default: selected)
- Install third party software updates for graphics cards and WiFi hardware (default: not selected)NOTE: For minimum specification PCs, un-select the option “Download updates while Installing Bodhi”, as this increases the memory demands of the installer. The method to run updates post-installation is outlined further through this tutorial.
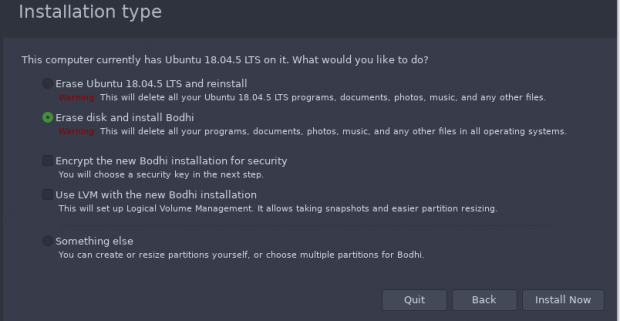
- 5. Installation Type:
- If you are installing Bodhi onto a system where it will be the only OS, select Erase disk and install Bodhi
- If the installer detects other operating systems you will see options to “install alongside…”. For example, Install Bodhi alongside Windows Boot Manager
- If you need complete control over the installation target (or need to modify your disk Partitions) select the option “Something else“. This is an advanced option, care must be taken. When you have made your selected click Install Now.
-
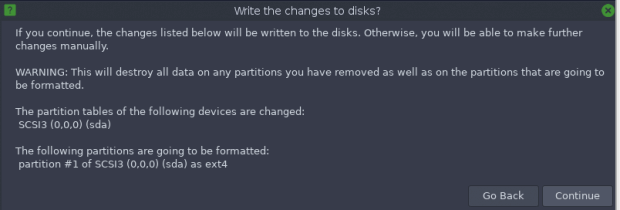
6. Write changes to disk?: No matter which option you selected in step # 5 you will come to a confirmation screen like the one below. Go Back if you are unsure of your changes; otherwise, click Continue
-
7 Time Zone: Select your time zone by either typing the name of a nearby city or click on your location on the map.
Note! The next screen is the last screen before the installation completes. If you are unsure of any settings you selected you may use the Back button to double-check/change them. When satisfied, click Forward.
-
8 Who are you?: As the singer Roger Daltrey once asked, enter your given name, for now skip the computer name we will return to this at the end. Now enter a username you would like for the primary user (non-root) account. Enter the password you would like associated with this account twice (for confirmation). Validate (or rename) the name to identify your computer. There is also a radio button choice between Log in automatically and Require my password to log in – the choice is yours but we always recommend requiring a password.
When you’re satisfied with your selection click to Continue, this last step requires no further intervention. A slide show of general Bodhi Linux info is presented. Sit back and relax – in just a few minutes you’ll have a shiny new Bodhi Linux system!
B: System Reboot
-
1) When the installation is complete you will be asked to restart. Click Restart Now
-
2) Next a screen will appear with shutdown messages which will ask you to remove the installation media then press Enter
C: First Boot
-
1) The first screen you will see is the GRUB boot screen. Bodhi Linux will be highlighted by default, and if no action is taken Bodhi Linux will boot automatically. If there are any other operating systems installed they can be selected by pressing the keyboard arrow keys then press Enter.
-
2) Type your password in the text entry field (it will appear on the screen as a series of asterisks) then press Enter
-
3) Once you are logged in, you will be presented with Bodhi Linux’s Quick Start Guide and the default Theme.
V: Post Installation
A. Update the System Software:
- There are many reasons to keep your Bodhi Linux fully updated/patched – improved functionality, bug fixes, and increased security (to name a few!). A full tutorial can be found at Keeping Bodhi Linux up-to-date
B. Get Familiar with Bodhi Linux:
- The first time you launch the Epiphany Web Browser (the default Web browser), you will be taken to The Bodhi Linux Quickstart Guide which will help you get connected to the Internet among many other basic tasks.
- Install Your Favorite Applications:
Visit the Bodhi Linux AppCenter for an extremely easy way to install your favorite applications.
C. Configure your new installation:
- Bodhi and the Moksha Desktop are highly customizable. If you want to tweak your newly-installed Bodhi system, covering topics such as changing Desktop Themes, Icon sets, Wallpaper – then click here to find out more!
D. Check out the Frequently Asked Questions:
- A series of thematic FAQS have been compiled, find out more on the wiki page: Introducing the Bodhi Linux FAQs
Bodhi Linux Home
Bodhi Linux – Wiki Home Page
Bodhi Linux – Wiki Table of Contents