
Configuring a New Bodhi Installation
Page Contents
Configuring a New Bodhi Installation
This article describes the initial tweaks you might make to a newly-installed Bodhi Linux system. These include setting up your date/time, keyboard (if you live outside the US), selecting a theme that suits your tastes, changing the wallpaper, and managing startup applications.
To make further changes, follow the links at the end of this article; they lead to other Bodhi Linux Wiki articles describing how to configure shelves, iBars, and virtual desktops, how to set up key bindings/edge bindings, and change the default system language.
Install Software Updates
Bodhi Linux and its associated software packages are continuously updated with security and feature improvements. Since the Bodhi Linux Live ISO was created, there will have been many, many updates – we strongly recommend running updates immediately after the initial installation and regularly thereafter. Trust us!
To update, open Terminology (Bodhi Linux’s default terminal emulator – Main Menu > Applications > System Tools > Terminology) and type:
sudo apt update && sudo apt dist-upgrade
You will need to type Y and press <Enter> during the update/upgrade process.
Note: the first update after installation could be lengthy
For further details see: Keeping Bodhi Linux Up-to-date
Date and Time
Date and Time settings can be configured in Clock Settings. Left-click the Clock in the shelf (bottom right of screen) and select Settings to open the Clock Settings. From here you can switch between 12/24 hour display, analog or digital, among other settings. Be sure to hit Apply Changes when you have completed your changes.
Themes
Moksha Themes
Moksha themes control the appearance of your desktop and its various components, including shelves, menus, icons, and dialog boxes. If you wish to change the Moksha theme that greets you on a new installation, open the Theme Selector, which can be achieved using a number of methods:
- Quick Launcher: open the Quick Launcher (<superkey>+<space>), type
themethen press <Enter> - Main Menu: go to Main Menu > Settings > Theme
With the Theme Selector open, if the window is not maximized, maximize it now, then click the System radio button. A list of themes available on your system will be displayed – in a new Bodhi Linux 7.x installation, the only themes are default and MokshaArcGreen.
Tip: more Moksha themes are available for download/installation via the AppCenter – when you download these, they will be automatically added to the System category in the Theme Selector
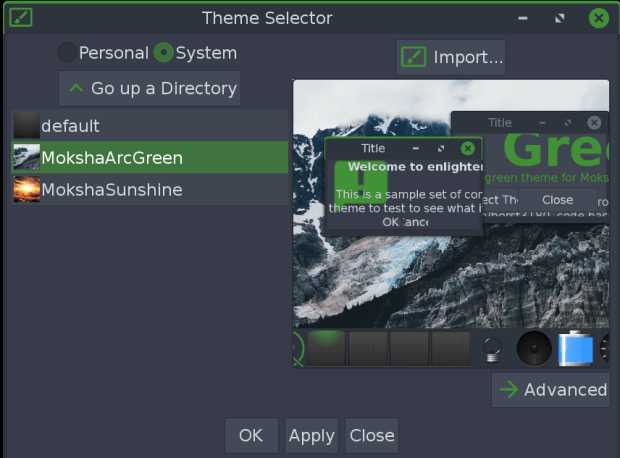
To try a theme, simply highlight it in the list and click Apply, then check how the Shelf and the Menus look. Try others! When you have made your final choice click OK.
Tip: a visualization of this step can be seen within the wiki page: Changing Themes
Note: Moksha themes do not control the appearance of application windows, i.e. such things as their scroll bars and menus; GTK themes control these (see below)
GTK Themes
The GTK theme is the overall theme that handles items such as the panel color, the backgrounds for windows and tabs, how an application will look when it is active vs. inactive, buttons, check-boxes, etc.. Ideally, you should select a GTK theme that matches your chosen Moksha theme. To do this, open the Application Theme:
- Quick Launcher: (<superkey>+<space>), type
Application Themethen hit <Enter> - Main Menu: Menu > Settings > Settings Panel > Look > Application Theme
With the Application Theme window open (on the GTK Applications tab), make your choice. For example, if you have chosen the Radiance Moksha theme, choose the GTK theme of the same name.
Tip: a visualization of this step can be this wiki page: Changing Themes
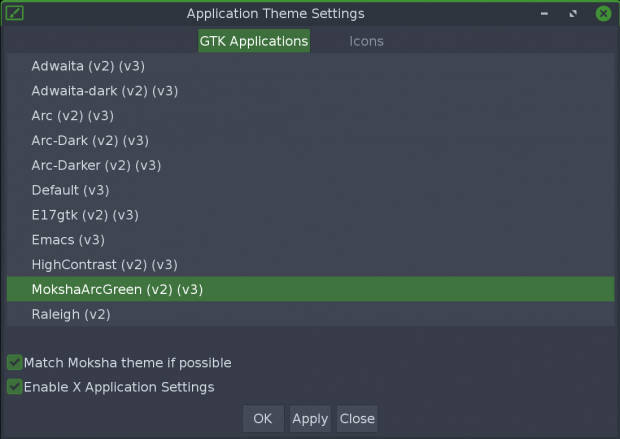
If you wish to try other GTK themes to see how they look, select them at this dialog box, click Apply, then open an application (such as your file manager) and check the appearance of its scroll bars and menus. Click OK at your final choice.
Icon Themes/Sets
Icons Themes (or Icon Sets, if you prefer), can be changed away from the icons bundled within your Moksha Theme (see above for more detail on Moksha Themes). This will change all display icons, such as those found on Shelves and in Menus, File Manager, etc.. If you wish to change your Icon Set, open the Application Theme Settings, this can be achieved using a number of methods:
- Quick Launcher: (<superkey>+<space>), type
Application Themeand hit <Enter> - Main Menu: Menu > Settings > Settings Panel > Look > Application Theme
With the Application Theme Settings window open (on the Icons tab) make your choice from the list of icon sets and click Apply.
Tip: a visualization of this can be seen in the wiki page named: Changing Icon Themes
![]()
More Icon Sets are available for download/installation via the AppCenter. When you download and install these, you will have to close and reopen Application Theme Settings to view/select.
Wallpapers
To change the wallpaper, go to Main Menu > Settings > Wallpaper; this opens the Wallpaper Settings dialog box, where you can choose a wallpaper from the list or click Use Theme Wallpaper to apply the wallpaper provided by the theme.
Tip: a visualization of this step can be seen within the wiki page: Changing Themes
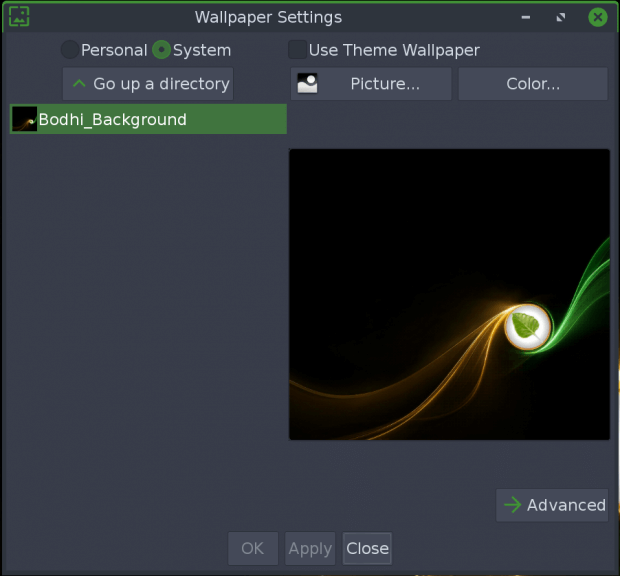
Note: you can have different wallpapers on different virtual desktops – click the Advanced button to reach the dialog box that allows this (you can also set this up at the Virtual Desktop Settings dialog box, as described here).
Managing Startup Applications
This area will let you add programs to your startup using the Startup Application panel. You can open Startup Applications using a number of methods:
- Quick Launcher (<superkey>+<space>), type
Startup Applicationsand hit <Enter> - Main Menu: Menu > Settings > Settings Panel > Apps > Startup Applications
With the Startup Applications window open (on the Applications tab) highlight any installed apps you would like to run on startup, click Add. Repeat as necessary, and finally click Apply.
Default Language
Language packages should have been installed when you correctly specified your location during the installation process, but you need to tell Moksha which language to use. Follow this link to change your default language.
Installing Additional Software
Now that you have configured your new Bodhi Linux installation, are you ready to add some sweet software? Click here for an in-depth view of the various methods to install software/applications. Alternatively, you can see what software is available in our AppCenter which can be installed directly from your browser.
Bodhi’s DuckDuckGo Browser Search
Bodhi Linux has a partnership with the wonderful folks at DuckDuckGo that helps generate some revenue to support our project.
The default browser (Chromium) that ships with Bodhi Linux 7.0.0 can be defaulted to use the partnered DuckDuckGo search engine. Additionally, if you have chosen a different default browser you can continue to support Bodhi Linux by configuring your preferred browser to use the Bodhi Linux DuckDuckGo search.
For more information see: Bodhi’s DuckDuckGo Browser Search
Further Configuration Settings
This article has described only a tiny fraction of the multitude of configuration settings that you might apply to your new Bodhi Linux installation. Moksha is a customizer’s paradise, and the articles listed below will introduce you to further possibilities.
- Moksha Settings Panel
- Shelves and iBars
- Virtual desktops
- Key bindings and edge bindings
- Profiles
- Moksha Desktop Customization
- Moksha Desktop FAQ
Further exploration:
Back to Moksha Guide
Bodhi Linux Home
Bodhi Linux – Wiki Home Page
Bodhi Linux – Wiki Table of Contents