
VirtualBox and Bodhi as Host
This page contains information about installing and configuring VirtualBox in Bodhi Linux 7.0.0 It is not a tutorial on how to use VirtualBox, as VirtualBox is a rather complex piece of software.
Page Contents
Installing VirtualBox
Open your terminal of choice, select one of the two methods below and run the commands stated, typing your password as prompted:
Once complete, unless you have altered your menu, VirtualBox can be run from the menu Applications→Accessories→VirtualBox. Note, a kernel module is started when Bodhi is booted, but nothing happens until you manually start a virtual machine.
Method 1: Using official Bodhi Linux Repositories
This method will install Virtualbox 5.2.x from the Bodhi Linux Repo. This is the Bodhi community-supported approach.
sudo apt-get update
sudo apt-get install virtualbox
Method 2: Using Virtualbox Repositories
This method will install the latest stable version of Virtualbox.
NOTE At the time of writing, the latest version was 6.1.16. Only use this method if you need the latest stable features and/or you need to mitigate issue(s) that are addressed in more recent versions.
Step 1
Create a new repo source list file. Using an editor of your choice (here I’ll use Vi Improved), with elevated (sudo) permissions.
sudo vi /etc/apt/sources.list.d/virtualbox.list
Then add the following text and save the file.
deb [arch=amd64] https://download.virtualbox.org/virtualbox/debian jammy contrib
Step 2.
Download and add the public keys for the new repo:
wget -q https://www.virtualbox.org/download/oracle_vbox_2016.asc -O- | sudo apt-key add -
wget -q https://www.virtualbox.org/download/oracle_vbox.asc -O- | sudo apt-key add -
Step 3.
Install VirtualBox 6.1 (latest version at the time of writing).
sudo apt-get update
sudo apt-get install virtualbox-6.1
Mouse and Keyboard Integration
Once one has installed a guest Operating System in VirtualBox, mouse and keyboard events should be communicated to the guest OS when the focus is on the virtual machine window. However, in some cases particularly with older Operating Systems, the virtual machine can capture the mouse and or keyboard making them unavailable to the Host Operating System and other applications running on the Host. The virtual operating system in this case does not know that it is not running inside another OS and expects to have complete control over your keyboard and mouse when the virtual machine window is clicked.
As a result upon clicking the VM, the Host Operating Systems loses control of the mouse and or keyboard, and VirtualBox by default will display the pop-up dialog below. Pressing capture in the dialog below will capture the mouse and keyboard and the Host Operating System will no longer have access to them. It should be noted that not only can this occur with older virtualized Operating Systems but it also can occur when newer Operating Systems are booting up and have not fully loaded, such as for example at grub screens.

In cases like this where the Host Operating Systems has lost control of the mouse and or keyboard, VirtualBox reserves a special key on your keyboard to un-grab the mouse and keyboard and return control to the Host: the Host Key. By default, the Host Key is the right Control key and VirtualBox displays the Host Key in the bottom right-hand corner of the virtual machine window to remind you:

You can change the default settings for the Host key in the VirtualBox Global Settings. Open VirtualBox, click on File→Preferences. In the left panel of the Preferences window select Input. On the right side of the Preferences dialog click the Virtual Machine Tab, and listed in that tab is the Host Key Combination. Clicking the Shortcut for that combination will allow you to change it.

USB Support
Enabling Host USB Support
Using USB devices such as USB drives, SD card readers, Web Cams, printers and other devices in VirtualBox improves the usability of your virtual experience. To enable host USB support, one must download the virtual box extensions pack, add yourself to the user group vboxusers and then install it in VirtualBox. To download this extension pack and add your user account to the user group vboxusers, open a terminal and run the command below. Substitute the version number from the exact version of VirtualBox you’re using (from VirtualBox select Help>About to get version number [5.2.10] & build number [93012]
wget https://download.virtualbox.org/virtualbox/5.2.10/Oracle_VM_VirtualBox_Extension_Pack-5.2.10-93012.vbox-extpack
sudo usermod -G vboxusers -a $USER
Now save whatever work you need to and close all windows. Log out and log back in to ensure the system reloads your user accounts.
Once you are logged back in open VirtualBox, click on File→Preferences. In the left panel of the Preferences window select Extensions. Under the Extension Packages panel right-click a blank spot on the screen and select Add Package.
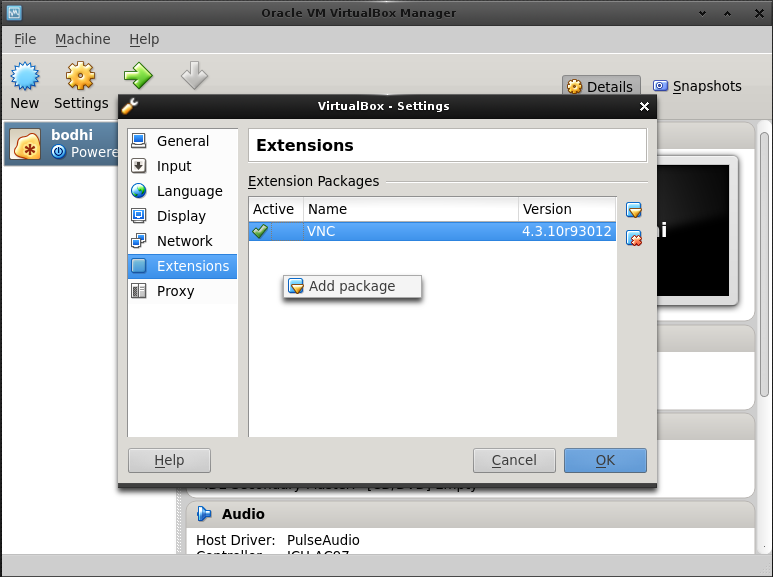
In the File Selection dialog navigate to the location you downloaded the virtual box extensions pack and select it.

A dialog will now open confirming you wish to install this VirtualBox extension. Select Install.
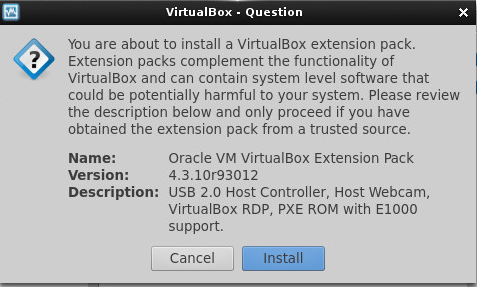
Since this extension pack is a non-free component of VirtualBox, you need to accept a license before you can install it. In the License dialog which opens, scroll to the bottom and press I Agree.
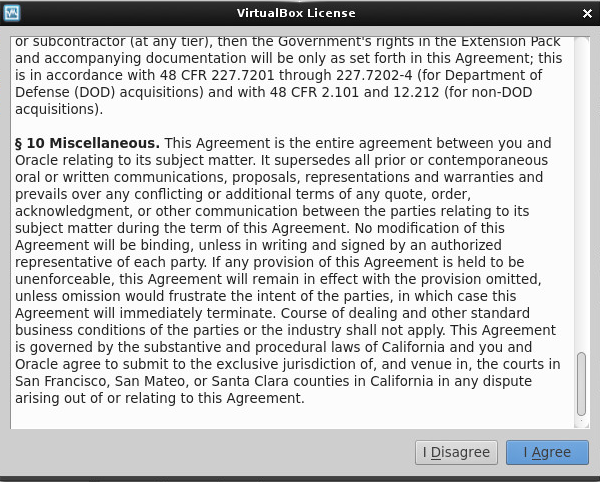
I would advise actually reading the License and only accepting if you are comfortable with its terms.
Bodhi will now prompt you for your sudo password. Enter it and let VirtualBox install the extension pack. Finally, VirtualBox is now able to utilize the Host USB system.
Utilizing Host USB Support
In order to utilize host USB support in VirtualBox, one must configure your virtual machine(s) to access the USB devices on your host. Here we are assuming you have some guest OSs installed in VirtualBox, if not create or download one ( see VirtualBox and Bodhi as Guest TO DO to learn how to create a Bodhi virtual machine in VirtualBox). For this example, we will be using Slitaz as the guest Operating System.
The first step is to enable USB support in the guest virtual machine. Click on Settings for your virtual machine, select the USB tab. Check the two boxes and click OK.

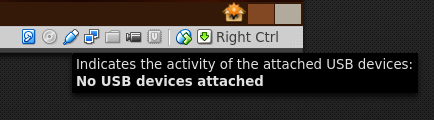
At this point, one may think that is all there is to it, but booting our virtual machine shows no USB devices found. To verify this move your mouse over the USB icon at the bottom of the virtual Machine window as shown:
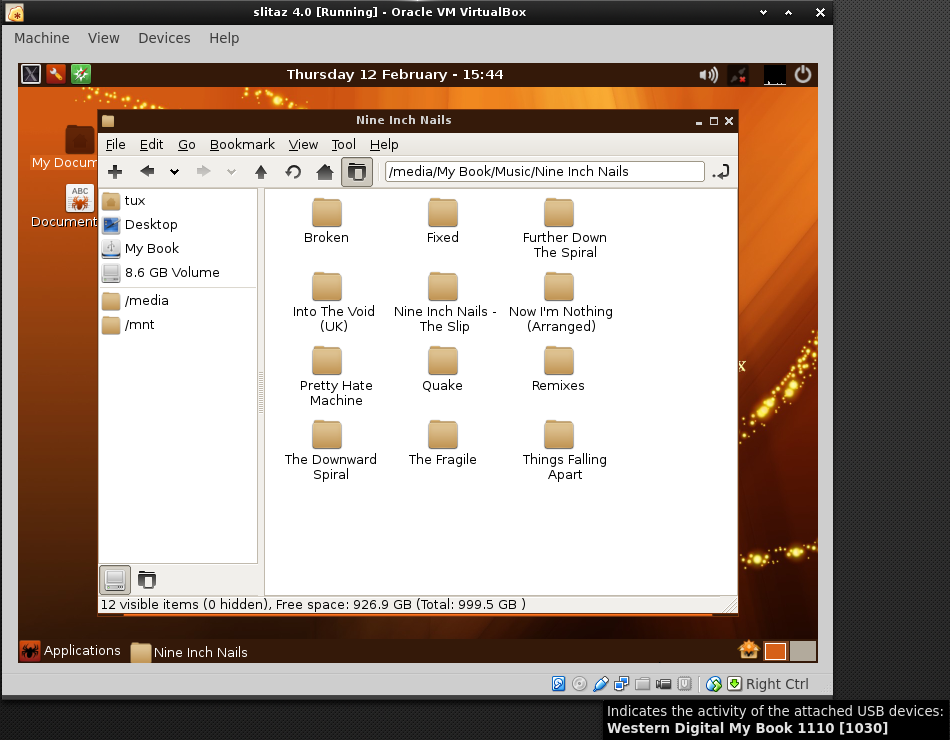
That is because one has to first choose what USB devices are available to your virtual machine in the machines Device settings. Click on Devices in your virtual machine’s menu and select USB Devices. Choose the device you wish to connect to, in this example a Western Digital external Hard Drive.

Once you have done this, the USB device will be available to your guest virtual machine.
Note:
Be careful with USB devices like an external hard drive that are in use on the host! You may suffer data loss if your USB hard drive is mounted on your host machine when you try to access it on your guest virtual machine. This can cause the external hard drive to be disconnected from the host without a proper shutdown.
ProTip:
You can use VirtualBox’s command-line interface VBoxManage to list all the USB devices that are accessible.
VBoxManage list usbhost
USB Device Filters
It is sometimes convenient to configure your virtual machine to automatically connect to a USB device, instead of having to manually add it after the virtual machine has booted. This can be achieved by the use of USB Device Filters.
Again highlight your virtual machine, click on Settings, and select the USB tab. On the right side of the USB Device, Filters panel click the USB icon that has a plus symbol. Select and click the USB device you want your virtual machine to automatically connect to at boot. In this example, the same Western Digital external Hard Drive considered previously will be selected:

After the device has been selected it will be listed and checked under USB Device Filters as shown below:

Click Ok to confirm the changes and dismiss the Settings Window. To test simply boot your virtual machine and verify that the OS has found the USB Device. Depending on the Operating System and the USB device some additional steps may be required before you can use the device. The Windows Operating System, for example, may have a Found New Hardware dialog one has to go through and some Operating Systems may not automatically detect an external hard drive as in this example. If this is the case for you consult the Operating System documentation for your virtual machine.
Fortunately for this example, the virtual OS does detect the external Hard drive as shown below:
Guest Additions
VirtualBox Guest Additions provide better performance and additional functionality to a guest virtual machine. These improvements include the following and more:
- Improved Mouse integration
- Shared folders
- Shared clipboard
- Full-screen capacity
- Better video support
VirtualBox Guest Additions are available for virtual machines running Windows, Linux, Solaris, or OS/2. The Guest Additions are designed to be installed inside a virtual machine after the guest operating system has been installed and are provided as a CD-ROM ISO file which is called VBoxGuestAdditions.iso. As the VirtualBox package in Bodhi’s repos does not include the Guest Additions they must be downloaded separately to be made available to your virtual machines. There are several ways of doing this but it is advised to install the guest additions on the Host system (Bodhi) using the repos. Open a terminal on the Host and execute:
sudo apt-get update
sudo apt-get install virtualbox-guest-additions-iso
In Bodhi, the VBoxGuestAdditions.iso will be downloaded to /usr/share/virtualbox/VBoxGuestAdditions.iso
To install the Guest Additions for a particular virtual machine, you mount the ISO file in your virtual machine as a virtual CD-ROM and install it from there. The particular details of how you install the VirtualBox Guest Additions depends upon the Operating System installed in your virtual machine. Consult the documentation of this Operating System for the details.
Common Issues
There are no known common issues.
For More Information
- VirtualBox Man Page
- VboxManage Man Page
- VirtualBox: Ubuntu Documentation
- The VirtualBox manual
- VirtualBox Community Page
Bodhi Linux Home
Bodhi Linux – Wiki Home Page
Bodhi Linux – Wiki Table of Contents