
Changing Moksha Themes
Page Contents
Changing Moksha Themes
If you are looking for new themes visit the AppCenter. Once a new theme is installed you can change themes using the guide below or for a basic guide on themes, and configuring in your Bodhi system click here.
Selecting a Moksha Theme
Location: Main Menu->Settings->Theme
Select the theme from the System list and then hit Apply
Selecting a GTK Application Theme
Location: Main Menu->Settings->All->Look->Application Theme
Scroll down until you find the matching GTK theme and select it, then hit Apply
Using a Wallpaper
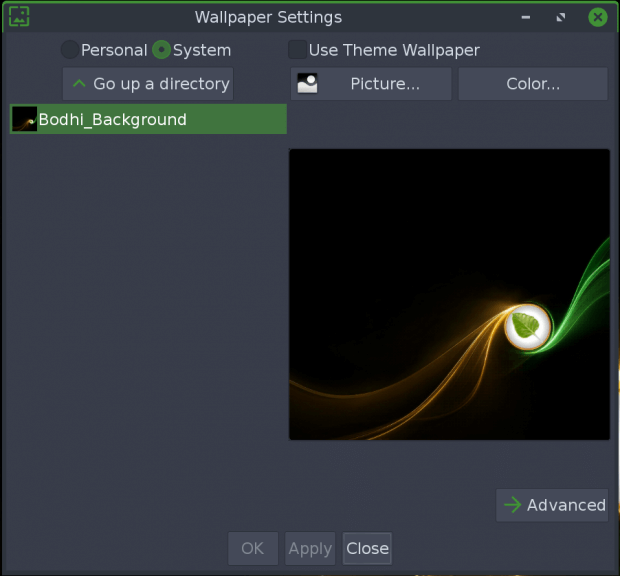
Location: Main Menu->Settings->Wallpaper
Check the Use Theme Wallpaper box and then hit Apply
***
THIS SECTION UNDER CONSTRUCTION
Thank you for your patience!
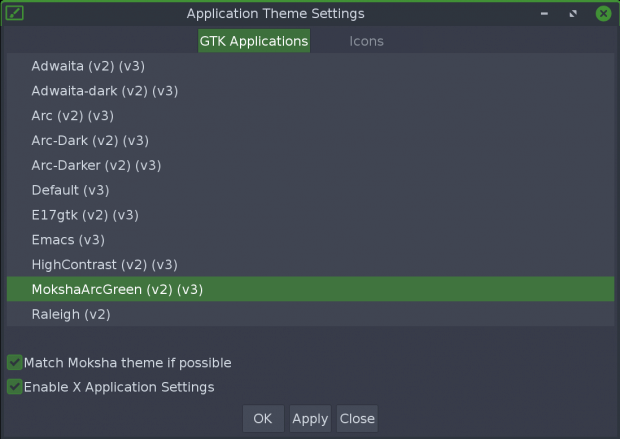
Application Theme Settings
To use this menu, you need to understand a bit about various types of themes in Bodhi. Not only does Moksha have themes which drastically change the look of your desktop (more on this later), there are themes for GTK as well as icon themes. These latter GTK/Icon themes are what we can change from this dialogue.
GTK Themes
Open the Application Theme Settings dialogue and you will see two tabs along the top of the window. The default tab is for the theme of GTK applications. These themes will change the look and feel of the majority of apps you will run in Bodhi, as a majority of linux applications are GTK-based.
To put it simply, GTK is a special set of libraries for programming languages which allows users to create standardized GUI-based, object-oriented applications, or apps which run outside of a terminal in their own windows. The windows and their contents are usually built upon these GTK libraries. GTK is not the only way to make a windowed application, but it is the most commonly used in linux application programming. Because of this, changing the GTK theme will change the appearance of the majority of graphical programs you use in Bodhi, from Synaptic to Thunar and many more.
You can find a plethora of GTK themes in the Ubuntu repos, which are accessible by default in Bodhi. They can be installed through Synaptic or with Apt. (hyperlinks needed) If you want to experiment in changing these, be sure to write down your current theme’s name before changing anything in case you’d like to revert back to that later. It is easy to forget the original settings and get lost trying to find them if you have a lot of these themes installed to choose from.
Next, the bottom of the dialogue has two check-boxes. These can be important. The first tells Moksha to match the GTK theme to the Moksha theme if possible. Moksha’s themes will tell your PC to use a specific GTK theme for best results with consistent looks throughout the system, and having this box checked will allow Moksha to control the GTK theme when you change Moksha’s themes.
If you un-check this box and later change your Moksha theme (discussed later), your GTK theme may not be automatically changed to match the new Moksha theme. You may or may not appreciate the effect this has on your system. If you select any other GTK theme from the available list, this box is automatically un-checked. This is not necessarily a bad thing. If you like other GTK themes, feel free to use whatever suits you. But if you want the full experience when switching your Moksha themes, be sure to keep this box checked.
Next is the “Enable X Application Settings” checkbox. X is a complicated subject which I won’t explain at this time, but just know that un-checking this box will prevent you from changing your GTK theme once the change is applied. You can simply re-check the box and apply again to get this ability back.
Icon Themes
Icon themes will change the look of icons across your Bodhi system. There are many icon themes available from Bodhi and Ubuntu’s repos which you can install just as you can with GTK themes. Changing the icon theme in Bodhi will drastically change the looks of icons in the menus, in file managers, in launchers like the iBar and Engage, and more. There are many interesting icon themes and you may want to experiment and find what you like best.
Standard Icon themes are found in your ‘/usr/share/icons’ folder, but some icons can also be found inside of Moksha themes.
Moksha’s themes often have their own icon themes built in, and Moksha themes can change your icon theme when the Moksha theme is changed. The first checkbox on the Icons tab gives Moksha permission to change your icon theme when Moksha’s theme is changed, just as Moksha does with GTK themes. Selecting a custom icon theme will un-check this button. If the button is un-checked, your icons will not change when switching Moksha themes.
In order to use the last two checkboxes, the first box must be un-checked. Failure to un-check the previous box will cause strange behavior with almost no effect when changing the latter two.
The next box is “Enable icon theme for applications”. Checking this box allows Moksha to override the system Icon theme with the icon theme built into the current Moksha theme. If the box is un-checked while the topmost box is also un-checked, the icon theme will revert to the system icon theme and the icon theme inside of the Moksha theme will not be used.
The last checkbox is “Enable icon theme for Moksha”. This box does something very similar to the previous box, but this time it should apply all around Moksha, not only for applications.
Theme Settings
Our Theme selection dialogue works very similarly to the Wallpaper settings dialogue. Please read that section if you need more information.
This settings dialogue allows you to change your Moksha theme. This theme is different than the GTK theme and Icon theme mentioned earlier in this guide. Moksha themes can automatically change the other types of themes in Bodhi to match your Moksha theme if the other themes’ settings are set correctly. This should happen by default unless you’ve tinkered around with changing GTK themes or Icon themes on your own.
Installing Moksha Themes:
If you want to change your Moksha theme, you first have to download and install new themes in your system. This can be done with Synaptic Package Manager or with Apt. (hyperlinks needed)
Bodhi’s Moksha theme packages are all named ‘bodhi-theme-moksha-*’ in the Bodhi repositories, with the * being replaced by the theme’s name. You can install them individually or install all of the Moksha themes available with a meta-package by using the following command:
sudo apt install bodhi-theme-pack
All Moksha themes installed with these methods are located at /usr/share/enlightenment/data/themes in your PC if you need to find them.
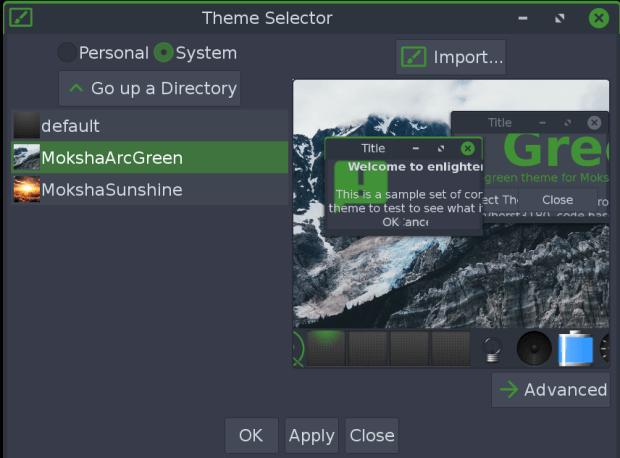
Switching Moksha Themes
Firstly, there are the ‘Personal‘ and ‘System‘ radio buttons. ‘System‘ is the default and is the the one you should choose unless you’re installing themes which you have manually downloaded elsewhere (…and it’s likely you are not).
You can navigate through files with this dialogue just as you can with the Wallpaper dialogue, but you will rarely need that feature here, so you should probably avoid the “Go up a directory” button unless you’re sure you need it.
To select a new theme, simply click or scroll with arrow keys through the list of available themes in the list on the left side of the window until you find one which appeals to you and then click ‘Apply’. The theme will be switched and Moksha will automatically restart in order to apply the changes.
Depending on settings in other settings dialogues, the wallpaper may not be changed automatically and the GTK/Icon themes may also not change when switching themes. See the sections on Wallpaper settings and Application Themes to learn more about this. But by default, changing the Moksha theme will also change these things.
Importing themes
If you have downloaded a theme online and want to try it with Bodhi Linux, click the ‘Import‘ button and navigate through your files to locate the downloaded theme and click ‘Ok‘ once you have selected the desired theme file. This should copy the chosen file into the ‘Personal‘ themes folder of your PC located at /home/user/.e/e/themes.
Once the theme is imported, click the ‘Personal’ radio button in the top left corner of the window and you should see this theme availble for use now. Select it and click ‘Apply’ to switch to the imported theme.
Customizing a theme
If you have multiple themes installed, you can do some interesting mixing and matching of various elements from the available Moksha themes on your system. While this can be complex, it can also be a lot of fun if you like tinkering with the looks of your system! Mixing themes can have drastic effects on the looks of your desktop, but don’t worry, it’s easy to undo any changes.
Click on the Advanced button of the Moksha Theme Settings dialogue. This will open a new dialogue with two lists on the left side of the window. The first is Theme Categories, which lists each element of the various Moksha themes you have installed. The other list is Themes and it lists all of your installed themes.
Let’s use the modules/clock element as an example here. This will change the appearance of Moksha’s clock module to the looks used in whichever theme you choose.
First, select modules/clock from the first list of options, and then select any theme other than the one you are currently using from the second list. You should see a preview of the module’s altered look in the Preview area of the window. Some themes re-use the same looks for certain modules, so don’t be surprised if there is not a visual change between certain themes when doing this.
In order to make the desired change in your system, you must first click the Assign button below the Theme Categories list and then click Apply. Moksha will restart and the changes should be visible in your system now.
To undo this change, click on the Advanced button in the theme selector again and select the modules/clock option again. This option should have a check-mark next to it once it has been modified. Now click Clear and then click Apply and Moksha will restart again. Your theme should be back to normal now.
If you have made multiple changes to your theme, you can use the ‘Clear All’ button to reset everything to the default settings of your current theme.
You can change any element of any theme on your system when modifying things in this way. Feel free to be creative and make Moksha look however you like!
Back to Configuring a New Bodhi Linux Installation or read about Moksha’s Settings Panel