
Key Bindings and Edge Bindings
Page Contents
Bindings (aka shortcuts) Overview
Want to quickly disable your laptop’s touchpad? Then set up a Key Binding (aka keyboard shortcut).
Want to easily switch between desktops? Use an Edge Binding (aka mouse shortcut).
- Key Bindings specify the actions that occur when you press a key combination (i.e. they bind the action to that key combination)
- Edge Bindings control what happens when you click a window edge or a corner of the screen
Use bindings to make your life that little bit easier, or to perform an action that would be impossible by any other means. The good news is that it is really easy to set these up by simply choosing an action at the Key or Edge Bindings Settings dialog box.
The Key Bindings
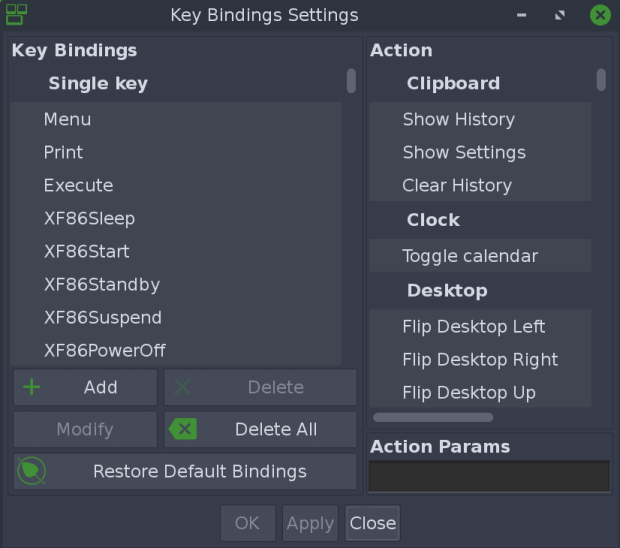
Key Bindings (aka keyboard shortcuts) – to open the configuration dialog box shown below, navigate to:
Main menu > Settings > Settings Panel > Input > Key Bindings
The left Key Bindings panel lists the (large) number of key bindings that have been set by default, the Action pane on the right lists the (huge) number of possible actions. One of the default key bindings is <Shift>+<F10>; this will maximize a window vertically – it is a good idea to press this when you open this dialog box to see more of what’s on offer.
Users of earlier versions of Bodhi Linux noticed one very important feature lacking, which was common in some other desktops; a previewer for common shortcuts. These shortcuts are called Key Bindings in Bodhi Linux. Previously there was a Key Bindings setting available, but users could not see all of the basic bindings in one panel. You would have to scroll down and see what shortcuts is assigned to a particular action.
This has been updated! Our developers listened to users and decided to create something for better quick view with the goal of having a dialog which respects all changes a user does in Key Bindings settings. Now users can easily see their own set of shortcuts. To access the new Basic Moksha Keybindings dialog box for a preview of default shortcuts, navigate to:
Main menu > Settings > Key Bindings
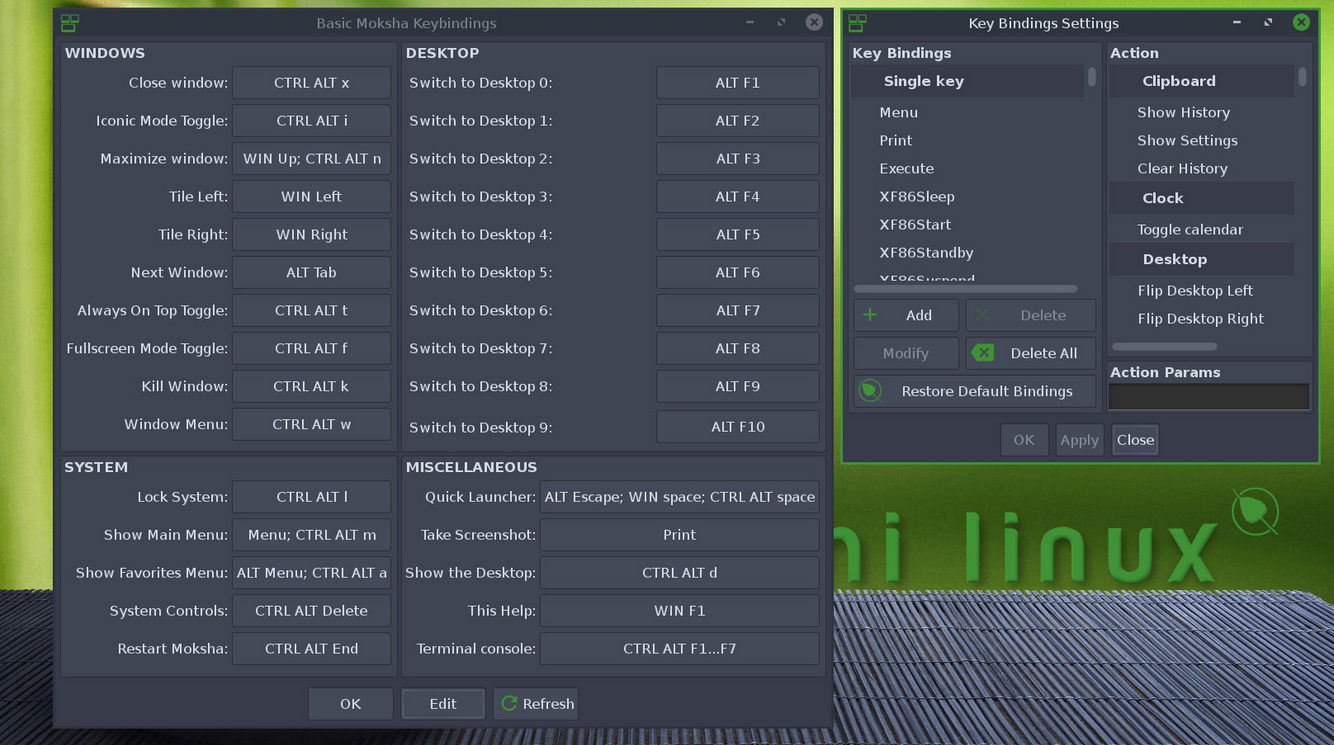
In addition to the new menu item to access this dialog box, <SupderKey>+<F1> may also be used for quick access to this feature. For better understanding see the screen cast (the <SuperKey> is sometimes referred to as the “Windows” or “Win” key).
If you examine the contents of the Basic Moksha Keybindings dialog box, a large number of Key Bindings have been set by default. These are also listed in the table at the end of this article. You can change any of these, and you can add others.
Creating your own key bindings
Notice that hardly any <SuperKey> combinations (i.e. the “Windows” key pressed in combination with another key) have been used for the default bindings; this leaves them free for your own use.
For example, suppose you have upgraded from one version to the next, but wish to continue using the previous version’s binding (<SuperKey>+<Space>) to open Quick Launcher – the procedure is:
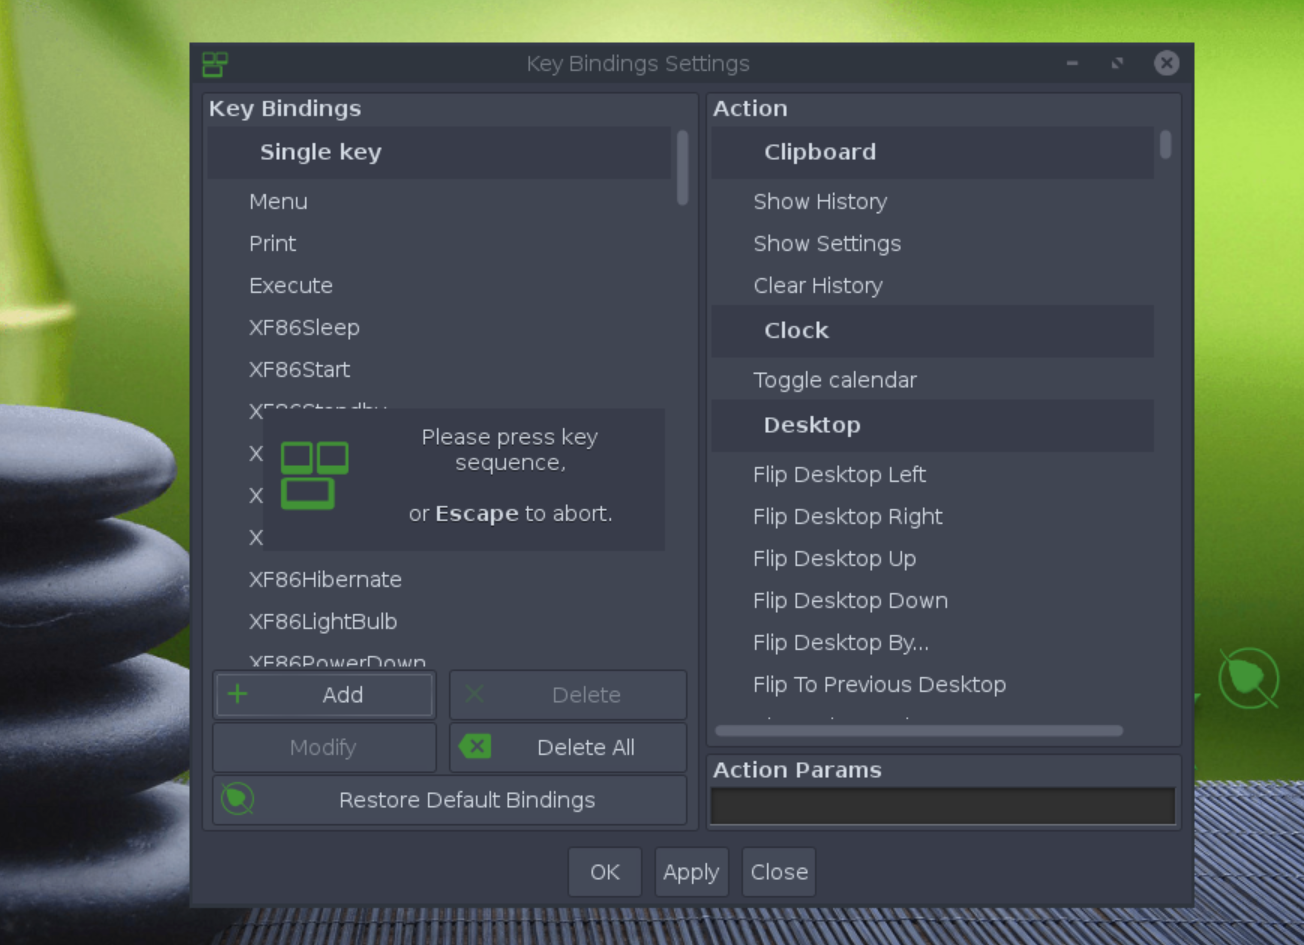
- Click the Add button
- Press the key combination you wish to use (e.g. <SuperKey>+<Space>)
- Select Show Quick Launcher (about one-third of the way down the Action pane)
- Click Apply
You don’t have to restrict yourself to SuperKey combinations, of course. If you inspect the list of key bindings at the end of this article you will see that <Alt>+<Space> is unused, and so you might bind this to the action Launch Settings Panel (about half-way down the Action pane).
A key binding to disable your laptop’s touchpad must execute the appropriate command. To set this up, click the Add button at the dialog box above (Step 1), press your desired key combination (Step 2), then select Command (in the ‘Launch’ section about half-way down the Action pane). Then, in the Action Params box at the foot of this pane, replace the contents (some example syntax) with
synclient TouchpadOff=1
and click Apply
If you want to set up another Key Binding to re-enable the touchpad, the command to insert in the Action Params box is:
synclient TouchPadOff=0
Binding a keyboard shortcut to launch a command
Navigate to: Settings Panel > Input > Key Bindings
or: Main Menu > Settings > Key Bindings > Edit
or: <Alt>+<Esc> and type key bindings followed by <Enter>
or: <SuperKey>+<Space> and type key bindings followed by <Enter>
or: Main Menu > Quick Launcher and type key bindings followed by <Enter>
or: <SuperKey>+<F1> (in the latest Moksha release)
Click Add and it’ll ask you to enter a new key sequence
Press the key combination you want to bind, for example <Ctrl>+<Alt>+<T>
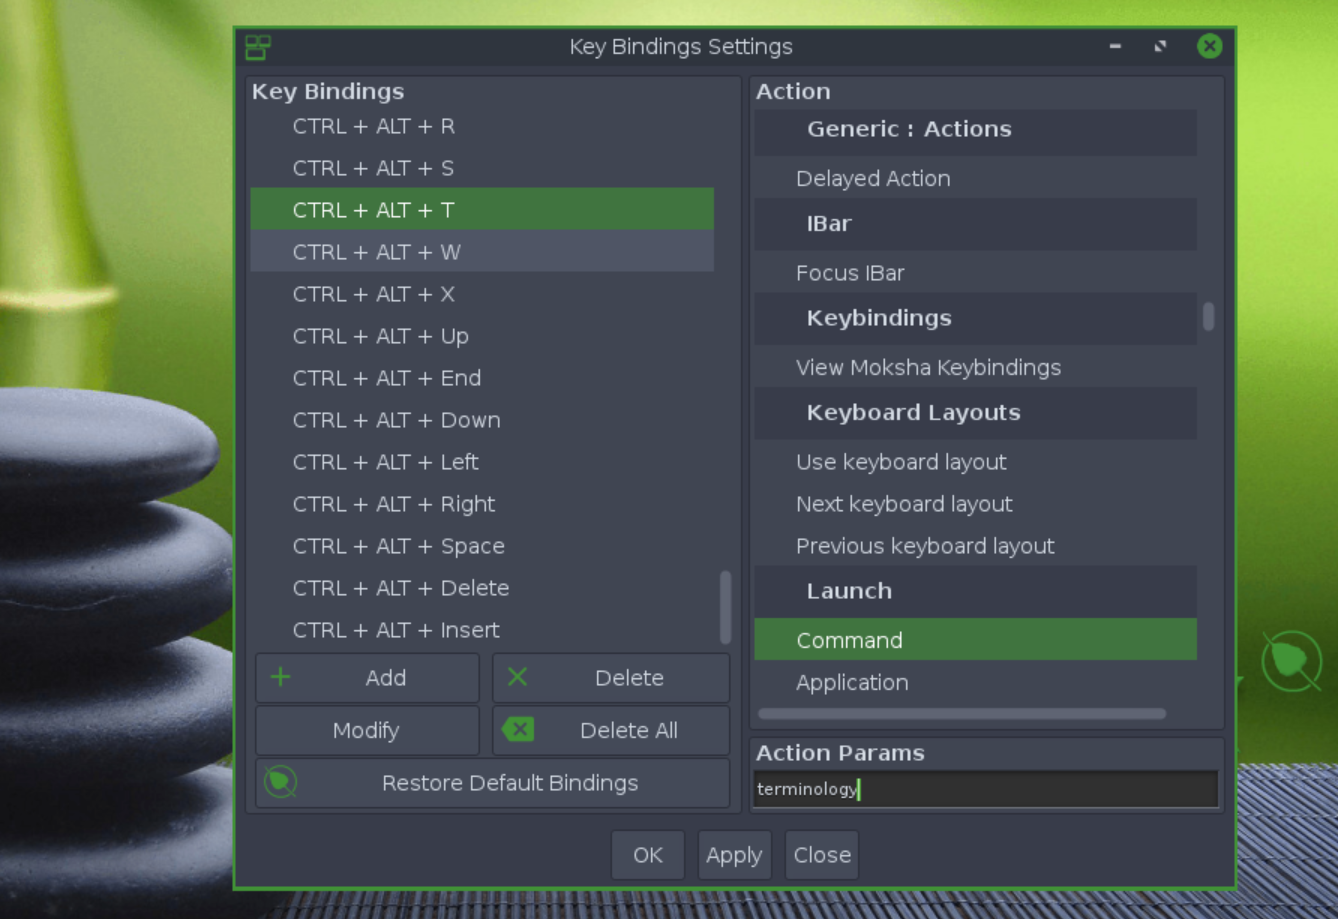
You will see that key combination is already set for Always on Top Toggle but that does not mean we it cannot be changed. On the right side, scroll to the Launch Section and selectCommand. Then type terminology into the Action Params Box and hit Apply.
It’s that easy!
The Edge Bindings
Edge Bindings (aka mouse shortcuts) – to open this configuration dialog box, go to:
Main menu > Settings > Settings Panel > Input > Edge Bindings
It is similar to the Key Bindings dialog box shown above, with the same Action Pane contents at the right, but Edge Bindings listed at the left. By default, no Edge Bindings have been set, so the left pane is empty. You can set up to eight Edge Bindings – one for each edge and one for each corner.
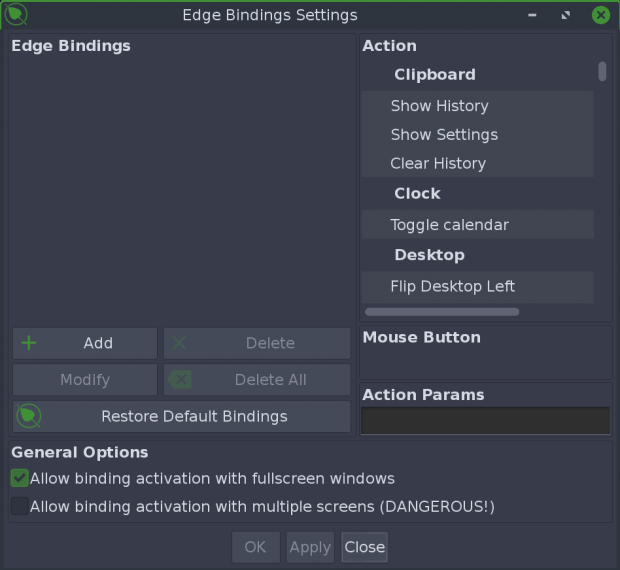
Suppose you wish to set up an Edge Binding to show the desktop (i.e. minimize all open windows) when you click the bottom right corner of the screen; the steps to accomplish this are similar to those for Key Bindings:
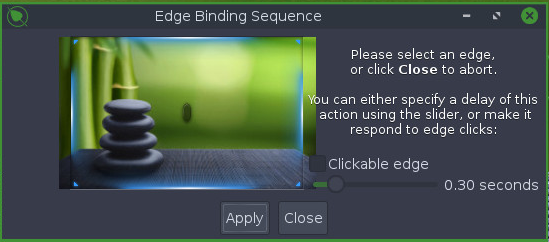
- Click the Add button. This opens the Edge Binding Sequence dialog box shown below
- Click the edge or corner that wish to use for your binding, select the Clickable Edge option, and click Apply – you are returned to the Settings dialog box
- Select Show The Desktop (near the top of the Action pane)
- Click Apply
If you make use of virtual desktops, you might set a left-edge click to cycle left through the desktops, and a right-edge click to cycle to the right. The Action you should select in this case is Flip Desktop Linearly…, with -1 entered in the Action Params box for a left flip, and 1 for a right flip.
Default Key Bindings/Keyboard Shortcuts
The table below shows the Key Bindings (keyboard shortcuts) that have been set-up by default in Moksha:
| Single key | |
| Menu ( |
Show Main Menu |
| Take Screenshot | |
| Single MultiMedia/XF86 keys | |
| Sleep | Suspend System |
| Start | Show All Applications Menu |
| Standby | Suspend System |
| Suspend | Suspend System |
| PowerOff | Power Off System |
| AudioMute | Mute Volume |
| Hibernate | Hibernate System |
| PowerDown | Hibernate System |
| MonBrightnessUp | Screen Backlight Up |
| MonBrightnessDown | Screen Backlight Down |
| AudioLowerVolume | Decrease Volume |
| AudioRaiseVolume | Increase Volume |
| Shift | |
| Shift + F10 | Maximize Window Vertically |
| Control | |
| Ctrl + M | Maximize Window Vertically |
| Ctrl + Menu ( |
Show Clients Menu |
| Alt | |
| Alt + F1 | Switch to Virtual Desktop 0 |
| Alt + F2 | Switch to Virtual Desktop 1 |
| Alt + F3 | Switch to Virtual Desktop 2 |
| Alt + F4 | Switch to Virtual Desktop 3 |
| Alt + F5 | Switch to Virtual Desktop 4 |
| Alt + F6 | Switch to Virtual Desktop 5 |
| Alt + F7 | Switch to Virtual Desktop 6 |
| Alt + F8 | Switch to Virtual Desktop 7 |
| Alt + F9 | Switch to Virtual Desktop 8 |
| Alt + F10 | Switch to Virtual Desktop 9 |
| Alt + F11 | Switch to Virtual Desktop 10 |
| Alt + F12 | Switch to Virtual Desktop 11 |
| Alt + Tab | Next Window |
| Alt + Menu ( |
Show Favorites Menu |
| Alt + Esc | Quick Launcher |
| Super key (sometimes called the Win or Windows key) | |
| Super key + Up | Maximize Window |
| Super key + Left | Maximize Window on Left |
| Super key + Right | Maximize Window on Right |
| Super key + Space | Quick Launcher |
| Ctrl + Shift | |
| Ctrl + Shift + F1 | Send Mouse to Screen 0 |
| Ctrl + Shift + F2 | Send Mouse to Screen 1 |
| Ctrl + Shift + F3 | Send Mouse to Screen 2 |
| Ctrl + Shift + F4 | Send Mouse to Screen 3 |
| Alt + Shift | |
| Alt + Shift + Up | Flip Virtual Desktop Up |
| Alt + Shift + Tab | Previous Window |
| Alt + Shift + Down | Flip Virtual Desktop Down |
| Alt + Shift + Left | Flip Virtual Desktop Left |
| Alt + Shift + Right | Flip Virtual Desktop Right |
| Ctrl + Alt | |
| Ctrl + Alt + A | Show Favorites Menu |
| Ctrl + Alt + C | Show History |
| Ctrl + Alt + D | Show the Desktop |
| Ctrl + Alt + F | Windows Fullscreen Mode Toggle |
| Ctrl + Alt + I | Iconic Mode Toggle |
| Ctrl + Alt + K | Kill Window |
| Ctrl + Alt + L | Lock Desktop |
| Ctrl + Alt + M | Show Main Menu |
| Ctrl + Alt + N | Maximize Window |
| Ctrl + Alt + R | Window Shade Up Mode Toggle |
| Ctrl + Alt + S | Sticky (Window) Mode Toggle |
| Ctrl + Alt + T | Window Always On Top Toggle |
| Ctrl + Alt + W | Window Menu (brings up a menu to max/min etc.) |
| Ctrl + Alt + X | Close (like Alt F4 in windows) |
| Ctrl + Alt + Up | Raise Window |
| Ctrl + Alt + End | Restart Moksha |
| Ctrl + Alt + Down | Lower Window |
| Ctrl + Alt + Left | Flip Desktop Linearly Left |
| Ctrl + Alt + Right | Flip Desktop Linearly Right |
| Ctrl + Alt + Space | Quick Launcher |
| Ctrl + Alt + Delete | Opens Ssystem Controls (power off, suspend, lock, etc) |
| Ctrl + Alt + Insert | Terminology (Command-line interface) |
Further exploration:
Back to Moksha Guide
Bodhi Linux Home
Bodhi Linux – Wiki Home Page
Bodhi Linux – Wiki Table of Contents